Wednesday, 30 October 2013

Creamy Saffron Yoghurt Recipe

It's not just Halloween today, the celebration of Diwali (Festival of Lights) also begins to day. Diwali isn't just November 5th, it's a week-long celebration. So, to mark that here is a recipe for  traditional Indian dessert that's creamy and flavourful and which makes and excellent Diwali treat.

This is a very simple to prepare, yet quite an indulgent and richly flavoured dessert, ideal for Diwali. The saffron also gives it that extra-special colour and indescribable flavour.

Indeed, this dessert is so good you could prepare and serve it for any special occasion.

Creamy Saffron Yoghurt Recipe

Serves: 6
Creamy Saffron Yoghurt Recipe: An indulgent vegetarian dessert for Diwali, served in glasses topped with pistachio nuts and accompanied by mango

Ingredients:

700g (1 lb 9 oz) Greek yoghurt (or your favourite set yogurt)
2 tsp green cardamom pods (extract the seeds)
10 saffron threads
1 tsp milk
1 tbsp shelled pistachio nuts, slivered
ripe mango, sliced, to garnish

Method:

Line a large, fine-meshed sieve with muslin. Set this over a bowl then spoon in the yoghurt and cover with a second piece of muslin. Put this aside to drain at room temperature for about 30 minutes (this allows the extra moisture to drain away).

Crush the cardamom seeds in a mortar. Scrape the drained yoghurt into a bowl. Stir in the sugar and mix in the ground cardamom. Mix the saffron strands with the milk and stir this into the yoghurt mixture.

Divide the resultant yoghurt mixture between six small glasses. Scatter over the pistachio nuts and serve with the fresh mango slices on the side.

Black Bean Pumpkin Soup Recipe

Happy Halloween, one and all!!! And for any ancient Celts out there, happy New Year's eve!

As today is Halloween, we have a classic 'winter warmer' style of soup made with pumpkin and black beans.

This is easy to prepare and ideal as a warming meal for anyone going out 'trick or treating', or merely for anyone who wants a delicious warming vegetarian dish (if you omit the ham) that is more substantial than your typical soup.

Just to show that pretty much any part of the pumpkin (apart from the stem) can be used, this soup is garnished with toasted pumpkin seeds.

If you do not want to use alcohol, you could substitute the sherry by unsweetened raw apple juice.

Black Bean Pumpkin Soup Recipe

Serves: 6–8
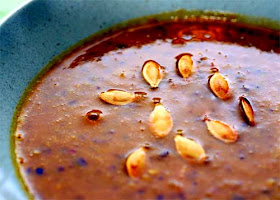
Black Bean and Pumpkin Soup: Classic 'winter warming' soup for Halloween that uses black beans and pumpkin as its base and which is served garnished with toasted pumpkin seeds

Ingredients:

1.2kg (4 cups) cooked black beans (tinned is fine)
200g (1 cup) tinned chopped tomatoes, drained
200g (1 1/4 cups) onion, finely chopped
75g shallots, minced
5 tsp ground cumin
1 tsp sea salt
1/2 tsp freshly-ground black pepper
115g (1 stick) unsalted butter
1l (4 cups) beef broth
440g (1 1/2 cups) pumpkin purée (either fresh or tinned)
120ml dry sherry
225g (1/2 lb) ham, cut into 3mm (1/8 in) dice
4 tbsp sherry vinegar
toasted pumpkin seeds, to garnish
sour cream, to garnish

Method:

Combine the black beans and tomatoes in a food processor. Pulse to chop, then purée lightly (do not make the mix too smooth).

Melt the butter in a 6l, heavy-based pan. Add the onion, shallot, garlic, cumin, salt and black pepper and cook gently over medium heat, stirring constantly, for about 6 minutes or until the onion is soft and is beginning to brown around the edges.

At this point, stir in the bean and tomato purée along with the beef broth, pumpkin purée and the sherry. Mix well to combine, then bring to a simmer and cook, uncovered, for about 25 minutes, stirring occasionally, until the soup is thick enough to coat the back of a spoon.

Just before serving add the ham and sherry vinegar. Bring the soup back to a simmer and cook, stirring constantly, for a few minutes, or until all the ingredients are heated through.

Season the soup to taste with salt and black pepper, ladle into warmed soup bowls, garnish with toasted pumpkin seeds and a dollop of sour cream then serve.

If you want more pumpkin recipes, including rare recipes from around the world, and ways of preparing every part of the pumpkin, why not visit the Celtnet Pumpkin recipes and information page?


As a thank-you for reading this Halloween-themed recipe (and hopefully preparing it!), I have teamed with the Celtnet Recipes website to give anyone who wants it a completely free eBook of Halloween recipes. Simply go to the download your free Halloween recipes eBook and grab your copy today, absolutely no strings attached.


UPDATE! My Big Book of Soup recipes has just been published for Amazon Kindle!

This is the largest eBook of soup recipes ever assembled. With over 1000 soup recipes divided into all the classic soup types.

In addition you get a chapter on the history of soups, with example historic recipes from the stone age right up to the 1880s. Indeed, in the historic chapter there are soup recipes from the stone age, medieval period, Tudor period, Stuart Period, Georgian period and Victorian period, over 160 authentic historic soups covering the entire history of soup making in Europe.

You also get chapters on African soups and Oriental soups, covering the soups of the entire continent of Africa as well as east and southeast Asia (Indian soups are dealt with in a chapter on Curried soups.

There are also chapters on the classic soups, like cream soups, chowders, vegetarian soups, vegetable soups, meat soups, fish and seafood soups, chicken soups, winter warmers and spring soups. In addition you get chapters on more unusual soups like fruit soups and chilled soups. The book is also dotted with recipes for wild food based soups, which are easily accessible from the index.

Every classic and traditional soup type is dealt with in this ebook! Get you copy today and help this blog and the Celtnet Recipes website keep going.

Madhura Seva Recipe

Because today is not just the day before Halloween, it's also the day before the week-long celebration of Diwali starts I'm including a classic Indian snack recipe as well as the previous recipe for pumpkin and marshmallow fudge.

In this case, the previous recipe would work just as well as a Diwali treat and this recipe for the snack, Madhura Seva makes a great treat all year round. This would be just as good as a Halloween treat, a Bonfire Night snack or a nibble for Christmas or New Year celebrations.

Easy to make, it truly is a versatile nibble. To make it go further you can blend with a mix of dried fruit and nuts before serving.

Look out for more Diwali recipes over the coming week, culminating with the 5th of November.


Madhura Seva Recipe

Meal type: Snack
Serves: 20+
Madhura Seva: A classic Indian snack of fried chickpea dough dipped in sugar syrup before serving

Ingredients:

250g (2 cups) chickpea (gram) flour
1/4 tsp salt
120ml (1/2 cup) water (about)
oil for frying
200g (1 cup) sugar
120ml (1/2 cup) water

Method

Mix together the flour and salt in a bowl. Work in the water, a little at a time, and kneading thoroughly until you have a smooth dough (take care, as chickpea flour will becomes sticky quickly).

Heat the oil in a large frying pan or a wok to a depth of about 2cm. Pass the dough through a seva maker or a colander so that strings of dough drop into the hot oil. Do not cook too many at a time, and use a slotted spoon to turn the dough over half way through so that it cooks evenly.

When the seva dough is nicely golden brown, transfer to a plate lined with kitchen paper to drain as you cook the next batch. When the seva is cool break into small pieces and set aside.

In the meantime, heat the 120ml water in a wide-mouthed saucepan. When the water is simmering, stir in the sugar until dissolved. Bring to a boil and cook, stirring constantly, for about 6 minutes or until the sugar syrup reaches the 1 string consistency (this is when a drop of the sugar syrup added to a cup of cold water forms small balls).

Reduce the heat and quickly add the seva pieces. Stir to coat in the sugar syrup then take the pan off the heat and set aside to cool.

Once cooled, drain the seva pieces and allow to dry then store in an air-tight container.

Pumpkin and Marshmallow Fudge Recipe

Here is a fantastic pumpkin-based sweet (candy), ideal for Halloween and all those trick-or-treaters.

You could buy canned pumpkin for this recipe, but it's so easy to make your own pumpkin purée that there's no need to bother. Just peel and de-seed pumpkin then steam until tender. Mash with a fork then press through a fine-meshed sieve with the back of a spoon to purée.

If you are celebrating Diwali, this candy also makes a wonderful seasonal treat.

Pumpkin and Marshmallow Fudge Recipe

Origin: USA
Makes: 64
Pumpkin and marshmallow fudge: Classic Halloween recipe of a milk-based fudge toffee containing pumpkin and milk chocolate chips in the mix

Ingredients:

400g (2 cups) granulated sugar
100g (1/2 cup, packed light brown sugar
150g (3/4 cup) unsalted butter
150ml (3/5 cup) evaporated milk
120g (1/2 cup) pumpkin purée
2 tsp mixed spice (pumpkin pie spice)
225g (1/2 lb) milk chocolate chips
200ml (4/5 cup) marshmallow creme (or dulce de leche)
75g (3 oz) pecan nuts, chopped
1 1/2 tsp vanilla extract

Method:

Line a 33 x 22cm baking tin with foil or greaseproof (waxed) paper, ensuring that you have an overhang over the sides of the tin (this will aid with easy removal when the fudge has set).

Combine the sugars, evaporated milk, pumpkin, butter and spice in a medium-sized saucepan. Bring the mixture to a rolling boil over medium heat, stirring constantly. Continue boiling, stirring constantly, for 10 minutes, or until a confectioner's thermometer inserted into the fudge reaches ??234??? to ??240??

At this point, quickly stir in the milk chocolate chips, dulce de leche, pecan nuts and vanilla extract. Stir the mixture vigorously for 1 minute, or until the milk chocolate chips are just melted.

Immediately pour the fudge mixture into the prepared pan. Set aside to cool on a wire rack for 2 hours, or until the fudge has cooled completely. Transfer to the refrigerator and chill over night.

The following day, take the fudge out of the tin and cut into 3cm square pieces.

Sore in an air-tight jar.


As a thank-you for reading this Halloween-themed recipe (and hopefully preparing it!), I have teamed with the Celtnet Recipes website to give anyone who wants it a completely free eBook of Halloween recipes. Simply go to the download your free Halloween recipes eBook and grab your copy today, absolutely no strings attached.

Tuesday, 29 October 2013

Green Herb Risotto with White Wine and Lemon Recipe

This is a light and fragrant vegetarian risotto, which can easily be prepared from left-overs and a few fresh garden herbs.

Because it's big on flavour but not heavy, this makes an excellent light lunch or supper dish. However, the creamy texture and blend of citrus and herbs in this dish also make it an useful accompaniment for fish dishes, particularly if you are looking for something different.

It's even good cold the following day!

Green Herb Risotto with White Wine and Lemon

Serves: 4–6

Green Herb Risotto with White Wine and Lemon: Light and fragrant vegetarian risotto of rice in a white wine and vegetable stock with herbs and lemon
Ingredients:

1.5l (6 cups) hot vegetable stock
125g (5 oz) unsalted butter
8 spring onions, finely chopped (both green and white parts)
150ml (3/5 cup) dry white wine
finely-grated zest of 1 lemon
juice of 1 lemon
500g (1 lb) risotto rice
4 tbsp freshly-chopped mixed herbs (eg parsley, basil, marjoram, thyme, chives)
75g (3 oz) grated Parmesan cheese
salt and freshly-ground black pepper, to taste

Method:

Place the stock in a saucepan and keep on a gentle simmer.

Melt half the butter in a large, heavy-based saucepan. Add the spring onions and fry gently for about 4 minutes, or until soft but not coloured. Pour in the wine and add half the lemon zest. Bring the mixture to a hard boil and cook until the wine has almost all evaporated away.

Add the rice and stir until coated in the butter. Now add a ladleful of the hot stock, stirring until the liquid has been absorbed by the rice. Add a second ladleful and continue cooking in this way until the rice is tender and creamy, but the grains are still firm (about 18 minutes' coking).

Season liberally with plenty of black pepper. Stir in the remaining butter along with the lemon zest, lemon juice and the Parmesan cheese.

Take off the heat, cover and set aside to rest for 2 minutes then serve immediately.

Monday, 28 October 2013

Cherry and Almond Cake Recipe

Today I'm doing Christmas a couple of months early. I have been lagging way behind with my own Christmas recipe preparations (partly because my wife isn't here with me yet.. but that's another story). So I dusted off my recipe collection (actually it's a database of notes and recipes on my laptop) and I happened to come across this one and decided to prepare it over the weekend.

This was originally intended as a recipe for an Easter cake — a quick version of a Simnel cake, if you will. But the combination of marzipan (almond paste) and cherries works as well for Christmas as for Easter that I decided to prepare it with Christmas in mind.

The result was a citrusy and rather spectacular looking cake. It keeps for quite a while and will be great to use to welcome my wife when she finally does get here. For me, that will be Christmas!

Cherry and Almond Cake Recipe

Serves: 12
Cherry and Almond Cake: A sponge cake containing grated marzipan and fruit in the batter served topped with cherries and white icing. A great alternative Christmas or Easter Cake

Ingredients:

250g (9 oz) butter, softened
175g (6 oz) golden caster sugar
5 eggs, beaten
250g (9 oz) self-raising flour
1 tsp baking powder
finely-grated zest of 1 orange
2 tbsp orange juice
250g (9 oz) marzipan, chilled and coarsely grated
1/2 tsp almond essence
To Decorate:
100g (4 oz) icing sugar, sifted
50g (2 oz) flaked almonds, toasted
12 natural glacé cherries
finely-grated zest of 1 orange

Method:

Cream together the butter and sugar until light and fluffy then stir in the eggs, flour, baking powder and the orange zest and juice. Toss the cherries in 2 tbsp flour (this will help prevent them from sinking) then stir into the cake batter along with the grated marzipan and almond essence.

Spoon the resultant batter into a greased and lined 20cm round-bottomed cake tin. Transfer to an oven pre-heated to 160ºC (325ºF, Gas Mark 3) and bake for about 90 minutes or until well risen (a skewer inserted into the centre should emerge cleanly).

Allow to cool in the tin for 10 minutes then turn out onto a wire rack to cool completely before decorating.

For the icing, mix the icing sugar with 1 tbsp water to form a loose paste. Scatter the almonds over the top of the cake and arrange 12 glacé cherries around the edge, using a little icing to fix each one in place.

Drizzle over the remaining icing and finish with a scattering of orange zest.

Sunday, 27 October 2013

Pumpkin Sponge Tart Recipe

Here is an interesting variant on the classic British sponge tart that blends pumpkin purée into the basic sponge batter before baking in a shortcrust pastry case.

This makes an excellent dessert, sliced into wedges and served with vanilla custard or cream. It can also be served as a tea-time treat.

The use of pumpkin in this recipe makes it suitable for serving at both Halloween and Thanksgiving.

You could buy canned pumpkin for this recipe, but it's so easy to make your own pumpkin purée that there's no need to bother. Just peel and de-seed pumpkin then steam until tender. Mash with a fork then press through a fine-meshed sieve with the back of a spoon to purée.

This seasonal recipe would be suitable as a Halloween Recipe, Bonfire Night (Guy Fawkes) Recipe or a Thanksgiving Recipe, depending on where you live in the world.

Pumpkin Sponge Tart Recipe

Serves: 6-8

SPumpkin Sponge Tart: A pumpkin-based sponge mixture baked in a shortcrust shell, served as a wedge with a cream topping
Ingredients:

2 large eggs
 60g (1/2 cup) plain flour
 100g (1/2 cup) granulated sugar
 100g (1/2 cup) brown sugar, packed
 200g (1 cup) butter, melted and cooled to room temperature
 65g (1/2 cup) puréed pumpkin
 2 tsp vanilla extract
 4 tsp mixed spice (pumpkin pie spice)
 100g (1 cup) sultanas (golden raisins)
 enough rich, sweet, shortcrust pastry for a 22cm diameter tart tin
 whipped cream, ice cream or custard, to serve

 Method:

 Prepare the pastry according to the recipe. Chill in the refrigerator for at least 30 minutes, then turn out onto a lightly-floured work surface and roll out until large enough to cover the base and sides of a 22cm loose-bottomed tart tin. 
Prick the base with a fork, then place in the refrigerator to chill as you prepare the filling.
 Add the eggs to a bowl and beat with an electric whisk until foaming, then beat in the flour, sugar and brown sugar. Add the vanilla extract, pumpkin and the mixed spice then mix until thoroughly combined. 
Now blend in the melted butter using a mixer at low speed. Gradually increase the speed of the mixer and beat until the ingredients are combined to a smooth batter. Fold in the sultanas.
Trim the top of the pastry neatly then spoon in the filling. Transfer to an oven pre-heated to 160ºC (325ºF) for about 50 minutes, or until the filling is set and springy to the touch and the pastry is golden.

Remove from the oven. Serve warm with custard, ice cream or whipped cream.

The tart can also be cooled and served sliced into wedges with tea or coffee.

Saturday, 26 October 2013

Adirasam Sweet Recipe for Diwali

This year, Diwali coincides with Halloween, and though most on-line calendars will give you a date of November 3rd, Diwali festivities actually run from October 31st 2013 through to November 4th.

As a result, I thought I had better post a few more classic Diwali treats on this blog. I posted a few last year, and they were well received, so there will be a few more for your delight over the next week or so.

For the most part these will be sweet dishes, either candies and sweetmeats or desserts, the traditional 'treats' typically served during Diwali. And if you do not know about Diwali, the Festival of Lights, check out this page on Diwali Information and classic Diwali recipes.

Adirasam Sweet Recipe

Origin: India
Festival: Diwali
Serves 4-6
Adirasam Sweet: A classic Diwali treat of spiced rice and sugar patties that are fried to cook

Ingredients:

200g (2 cups) raw rice
250g (1 1/2 cups) jaggery
1 tsp sukku powder (ground ginger)
oil for frying

Method:

Wash the rice thoroughly, then place in a large bowl of water and set aside to soak for 60 minutes.

After this time, drain the rice then spread out on a cotton tea towel and set aside to dry until the rice grains are no longer damp.

Turn into a coffee blender and grind to a fine powder. Scrape the jaggery then pound to a powder in a mortar. Turn the jaggery into a saucepan, add 1/2 tbsp water and bring to a boil, stirring constantly.

Take the melted jaggery off the heat and pass through a fine-meshed sieve to remove any dirt and large pieces. Pour into a clean pan and bring back to a boil, stirring constantly.

When the jaggery water has thickened take off the heat then stir in the rice flour and mix well to form a soft dough. Sprinkle over the cardamom powder and sukku powder and mix to combine thoroughly.

Cover and set aside to rest for between 4 and 6 hours.

After this time, heat oil in a deep fryer or deep pan to 180ºC. Apply a drop of oil to the palms of your hands. Take a small lime-sized ball of the dough and pat flat between your hands. Gently drop the flattened dough into the hot oil. Fry until nicely browned and cooked through. Remove with a spider or a large slotted spoon and press between two flat plates to remove any excess oil from it.

Prepare and fry the next adirasam.

Serve warm.

Thursday, 24 October 2013

Strawberry and Cream Layer Recipe

I've been posting a range of recipes, but haven't provided a classic dessert in a while. This one may look a little strange, but following my recent move to the southern hemisphere, my seasons are out of sync with all you people up there in the cold north!

With Summer most definitely on the way now (at least in the Southern Hemisphere!), here is a new twist on the traditional 'strawberries and cream' that turns the classic summer treat into an elegant dessert.

Strawberry and Cream Layer Recipe

Serves: 4
Strawberry and Cream Layer: An elegant dessert of strawberries and cream layered between puff pastry fingers

Ingredients:

375g (13 oz) all-butter puff pastry (thawed if frozen)
4 tbsp icing sugar
400g (14 oz) ripe strawberries, halved
1 vanilla pod
285ml (1 cup + 2 tbsp) double cream
140g (5 oz) golden caster sugar

Method:

Turn the puff pastry out onto a lightly-floured work surface and roll out to a 30cm (12 in) square. Transfer to a large baking tray and sit another baking tray on top. Transfer to an oven pre-heated to 200ºC (400ºF, Gas Mark 7) and bake for about 20 minutes, or until the pastry is golden brown.

In the meantime heat your grill (broiler) to high. Dust the top of the pastry sheet with 1 1/2 tbsp of the icing sugar then place under the grill and cook gently until the sugar has caramelized. Dust over 1 1/2 tbsp more of the icing sugar then place back under the grill and heat once more. Allow to cool slightly, but whilst still warm cut into 12 neat rectangles, trimming the edges neatly as you do so.

Dust the strawberries with the remaining icing sugar and set aside. Split the vanilla pod in half and scrape out the seeds into the cream. Whip lightly with the caster sugar until it just holds its shape.

To assemble the dish place a blob of the vanilla cream on each serving plate and stack the pastry biscuits, the remaining vanilla cream and strawberries at jaunty angles.

Serve immediately.

Wednesday, 23 October 2013

Nutella Swirl Pumpkin Muffins Recipe

Halloween is only a week days away now, and with the countdown beginning I thought I had better post a few more pumpkin-based Halloween-themed recipes on this blog (this also happens to work as a great Thanksgiving recipe).

The first recipe is an adaptation of a classic banana muffin that substitutes cooked and mashed pumpkin for the banana (this is a substitution that really works — you could also substitute cooked and mashed orange sweet potato in this recipe). The addition of Nutella or other chocolate spread then makes it into something that the kids will really love.

These muffins are so good that once you prepare them, this is a recipe that you will be making all autumn long, and not just for Halloween. For the British readers, these also make a great treat for Bonfire Night.

I'm also providing a link to a French-inspired recipe for how you can prepare your own home-made nutella substitute.

Give these tasty muffins a try... you know you want to...


Nutella Swirl Pumpkin Muffins Recipe

Serves: 12
Pumpkins made with a pumpkin-based batter in which nutella has been swirled, to give a chocolate ripple effect. A great treat for Halloween or Thanksgiving

Ingredients:

250g self-raising flour
1/2 tsp baking powder
150g golden caster sugar
1/2 tsp fine sea salt
2 large eggs, lightly beaten
115g unsalted butter, melted and cooled
300g pumpkin flesh, steamed until tender and mashed until smooth
1 tsp vanilla extract
4 tbsp Nutella (or your own home-made chocolate and hazelnut spread), at room temperature (or use this )

Method:

Sift together the flour, baking powder and salt into a bowl. Add the sugar and stir to combine. Set aside.

In a separate bowl, lightly beat together the eggs, butter and vanilla extract. Add the mashed pumpkin and stir well to combine.

Form a well in the centre of the dry ingredients and add the egg mixture, stirring thoroughly to combine with a fork, until the flour is moistened and the mixture looks like a lumpy paste (do not over-mix).

Line the wells of your muffin tin with paper cases (or liberally butter the moulds) then spoon in the butter, filling each one no more than half full. Lightly warm the nutella (or home-made chocolate spread) then for each muffin take a teaspoon and set in the centre of the muffin. Use a cocktail stirrer or a wooden skewer to swirl the nutella into the muffin batter (you want a swirl pattern, like making a marble cake) — take care not to turn the whole batter chocolatey.

Once all the muffins have been prepared, transfer to an oven pre-heated to 180ºC (350ºF) and bake for between 20 and 25 minutes, or until the muffins are cooked all the way through (a skewer inserted into the centre should emerge cleanly).

Remove from the oven and allow to cool in the tin for 5 minutes. Carefully turn out onto a wire rack and allow to cool for 5 minutes more. Serve warm, accompanied by tea or coffee.


As a thank-you for reading this Halloween-themed recipe (and hopefully preparing it!), I have teamed with the Celtnet Recipes website to give anyone who wants it a completely free eBook of Halloween recipes. Simply go to the download your free Halloween recipes eBook and grab your copy today, absolutely no strings attached.


UPDATE! My new recipes book eBook: Cupcakes, Muffins, Fairy Cakes and More — Baking Secrets has just been published in an edition for Amazon Kindle!

This recipe and over 360 other recipes for cupcakes, muffins and other small cakes can be found in this eBook.

The chapters in the book cover: Cupcakes (including: Vanilla and White Cupcakes; Chocolate and Dark Cupcakes); Microwave Cupcakes; Muffins (including: Refrigerator Muffins); Fairy Cakes and Butterfly Cakes; International Cupcakes; Cupcakes for Special Occasions; Icings and Frostings; Flour and Cake Mixes; Other Small Cakes; Historic Muffins and Cupcakes.

Not only do you get all the recipes, but there are over 50 illustrations throughout the book. You also get a history of cupcakes and muffins, showing how they evolved from British muffins and crumpets to become an American phenomenon.

Every classic and traditional cupcake and muffin style is dealt with in the book and you get over 60 recipes for different types of icings and frostings. The ebook is everything you need to successfully bake cupcakes and muffins. You also get a chapter covering different muffin and cupcake styles from across the globe. Get you copy today and help this blog and the Celtnet Recipes website keep going.

Spaghetti with Chilli and Courgettes Recipe

After a number of sweet and indulgent recipes, all based on chocolate, it's time for something savoury again.

And just because I love chillies, here is a classic chilli-based recipe, which just happens to be vegetarian. Tough I do like my meat, I think it's good to balance that out every now and then with a good vegetarian recipe.

This is a great evening meal recipe as it's easy and quick to prepare, is healthy and looks great when you serve it to someone else.

The chillies also give this dish the spicy kick or edge that personally I like. However, like all foods with a fair amount of fat to them (think yoghurt or sour cream) the Parmesan cheese helps to temper the full heat of the chilli (do not skimp on the Parmesan cheese when you serve this!).

All in all, this is one of my standard fallback recipes as I typically always have the ingredients in my fridge and larder.


Spaghetti with Chilli and Courgettes Recipe

Serves: 4
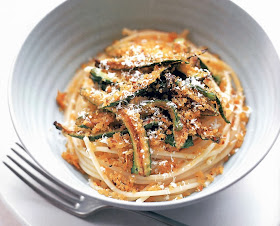
Spaghetti served topped with strips of vegetables in a chilli dressing with a generous dusting of parmesan cheese on top. All in a white bowl.

Ingredients:

400g (1 lb, scant) spaghetti
90ml (6 tbsp) olive oil
100g (4 oz) breadcrumbs
8 small or baby courgettes (zucchini), cut into julienne strips
2 garlic cloves, crushed
2 small red chillies, finely chopped
finely-grated Parmesan cheese, to serve

Method:

Bring a pan of salted water to a boil, add the pasta and cook according to the packet instructions (about 8 minutes). When the pasta is al dente, drain and return to the pan to keep warm.

In the meantime, place a large frying pan over medium heat. Add half the olive oil, swirling the pan to coat then add the breadcrumbs. Cook for 3 minutes, stirring constantly, until the bread is nicely and evenly browned. Remove from the pan and turn onto a plate.

Add the remaining oil to the pan, stir in the courgettes and cook over high heat for 5 minutes, stirring often, or until the courgette pieces are golden brown and beginning to crisp.

Stir in the garlic and chillies and continue cooking for 5 minutes, stirring often. Add the cooked pasta and the breadcrumbs to the pan then toss to coat.

Serve immediately, garnished by freshly-grated Parmesan cheese.

As an aside and an interesting fact, chilli (hot pepper or chili) is one of the few spices from the new world to have gained acceptance and acclaim world wide (vanilla and allspice are the other two). Indeed, from its discovery by Europeans it only took chillies 60 years to be spread around the globe.

If you would like to know more about how chillies conquered the world, here is an interesting article on the global spread of chillies from the New World to the Old Word.

Sunday, 20 October 2013

Spaghetti with Chilli and Courgettes Recipe

After a number of sweet and indulgent recipes (see the previous postings for the Orange Profiteroles with Orange Chocolate Sauce and White and Dark Chocolate Cake recipes), all based on chocolate, it's time for something savoury again.

And just because I love chillies, here is a classic chilli-based recipe, which just happens to be vegetarian. Tough I do like my meat, I think it's good to balance that out every now and then with a good vegetarian recipe.

This is a great evening meal recipe as it's easy and quick to prepare, is healthy and looks great when you serve it to someone else.

The chillies also give this dish the spicy kick or edge that personally I like. However, like all foods with a fair amount of fat to them (think yoghurt or sour cream) the Parmesan cheese helps to temper the full heat of the chilli (do not skimp on the Parmesan cheese when you serve this!).

All in all, this is one of my standard fallback recipes as I typically always have the ingredients in my fridge and larder.


Spaghetti with Chilli and Courgettes Recipe

Serves: 4
Classic vegetarian dish of spaghetti served with strips of courgettes (zucchini) and carrots in a spicy chilli dressing served topped with plenty of Parmesan cheese

Ingredients:

400g (1 lb, scant) spaghetti
90ml (6 tbsp) olive oil
100g (4 oz) breadcrumbs
8 small or baby courgettes (zucchini), cut into julienne strips
2 garlic cloves, crushed
2 small red chillies, finely chopped
finely-grated Parmesan cheese, to serve

Method:

Bring a pan of salted water to a boil, add the pasta and cook according to the packet instructions (about 8 minutes). When the pasta is al dente, drain and return to the pan to keep warm.

In the meantime, place a large frying pan over medium heat. Add half the olive oil, swirling the pan to coat then add the breadcrumbs. Cook for 3 minutes, stirring constantly, until the bread is nicely and evenly browned. Remove from the pan and turn onto a plate.

Add the remaining oil to the pan, stir in the courgettes and cook over high heat for 5 minutes, stirring often, or until the courgette pieces are golden brown and beginning to crisp.

Stir in the garlic and chillies and continue cooking for 5 minutes, stirring often. Add the cooked pasta and the breadcrumbs to the pan then toss to coat.

Serve immediately, garnished by freshly-grated Parmesan cheese.

As an aside and an interesting fact, chilli (hot pepper or chili) is one of the few spices from the new world to have gained acceptance and acclaim world wide (vanilla and allspice are the other two). Indeed, from its discovery by Europeans it only took chillies 60 years to be spread around the globe.

If you would like to know more about how chillies conquered the world, here is an interesting article on the global spread of chillies from the New World to the Old Word.

White and Dark Chocolate Cake Recipe

To follow on from yesterday's rather indulgent dessert of Orange Profiteroles with Orange Chocolate Sauce, today we have another rather indulgent recipe.

If you like cakes, or you like chocolate then this cake is definitely for you. With two vanilla layers and two chocolate and coffee layers that are alternately stacked this cake looks fantastic and with its white and dark chocolate topping it makes it an indulgent treat.

This would be great as a a birthday recipe cake, but if you alter the decoration to make a spider or other ghoulish shape on top this would also be a fantastic recipe for a Halloween cake.

The recipe is truly worth it for the ganache alone, as this chocolate topping and filling can be used for a whole host of other recipes (use it as a topping for the profiteroles I posted yesterday).

Of course, maybe you just want to bake this as a treat for yourself. You know you want to...


White and Dark Chocolate Cake Recipe

Serves: 12
Sponge cake with alternating white and brown layers sandwiched with ganache topped with chocolate ganache and a white chocolate ribbon and white chocolate balls

Ingredients:

75g (3 oz) butter, softened
100g (4 oz) white chocolate (the best is any brand with real vanilla seeds)
100g (4 oz) dark chocolate (at last 70% cocoa solids)
3 eggs
100ml (2/5 cup) whole milk
175g (1 cup, scant) caster sugar
1 tsp baking powder
200g (8 oz) self-raising flour
2 tbsp strong coffee
1 tsp vanilla extract
For the Ganache Topping:
285ml (1 1/5 cups) double cream
200g (8 oz) dark chocolate (at last 70% cocoa solids)
50g (2 oz) white chocolate, melted
1 small bag of white Maltesers

Method:

For the cake, place the white and dark chocolate int two separate bowls. Melt over a pan of barely simmering water. In the meantime, combine all the other cake ingredients (except the coffee and vanilla) in a bowl and beat until creamy.

Divide the creamy mixture between the two bowls of melted chocolate then add the coffee to the bowl with the dark chocolate and the vanilla to the bowl with the white chocolate. Stir until thoroughly mixed then pour each batter into its own 20cm diameter sandwich tin that's been greased and lined.

Transfer to an oven pre-heated to 180ºC (350ºF, Gas Mark 4) and bake for about 25 minutes, or until well risen and springy to the touch. Turn out onto a wire rack to cool.

For the ganache, pour the cream into a pan and bring just to a boil. Break the chocolate into a heat-proof bowl and pour over the cream. Set aside for 5 minutes then stir the mixture until smooth. Allow to cool and thicken then split both cakes in half horizontally before layering up with the ganache (alternate the white and dark layers).

To decorate, drizzle a zigzag pattern of the white chocolate over the top of the cake and finish with the white Maltesers. Allow to set then slice into wedges and serve.

As a thank-you for reading this Halloween-themed recipe (and hopefully preparing it!), I have teamed with the Celtnet Recipes website to give anyone who wants it a completely free eBook of Halloween recipes. Simply go to the download your free Halloween recipes eBook and grab your copy today, completely free and with absolutely no strings attached.

Saturday, 19 October 2013

Orange Profiteroles with Orange Chocolate Sauce Recipe

Today we have an indulgent dessert for you. I love orange-based sauces with both savoury and sweet dishes — and as a number of people have asked for a choux pastry recipe, here is my foolproof version used to make profiteroles. So here I have adapted an orange and chocolate sauce that I typically serve with duck to be used as a sweet sauce for a dessert.

Typically profiteroles are filled with cream, but as I am not a big fan of cream, I've used ricotta cheese in this recipe. If anything, the slightly savoury flavour of the ricotta works better with the orange sauce than cream does, but you opinion may differ!

Admittedly, this dessert takes a bit of effort to make, but, believe me, the effort yields a truly worthwhile result. Here is a great dessert if you want a bit of 'wow' factor!

Orange Profiteroles with Orange Chocolate Sauce

Serves: 6
Choux pastry profiteroles stuffed with an orange ricotta cheese mix served topped with an orange chocolate sauce

Ingredients:

For the Profiteroles:

60g (2 oz) plain flour
40g (1 1/2 oz) butter or margarine
1 egg
1 egg white

For the Filling:

150g ricotta cheese
2 tsp orange zest
1 tbsp icing sugar, sifted

For the Orange Sauce:

250ml double cream
2 tbsp brown sugar
1 tbsp butter, diced
100g dark chocolate
1 tbsp orange zest

Method:

Combine the butter or margarine in a pan with 125ml (1/2 cup) water. Bring to a boil then take off the heat. Add the flour and beat thoroughly with a wooden spoon until the mixture is smooth and comes away from the sides of the pan to forma ball.

In a separate bowl whisk together the egg and egg white then gradually beat this egg mixture into the flour mix. You need to beat very well to incorporate lots of air into the mix (it's this that causes the buns to rise).

Line a baking tray with greaseproof (waxed) paper then use a teaspoon to drop 18 mounds of the batter onto this (ensure that you leave plenty of space for them to rise).

Transfer to an oven pre-heated to 200ºC (400ºF, Gas Mark 6) and bake for about 20 minutes or until golden brown (do not open the oven door during the cooking time, or the profiteroles will sink).

Remove from the oven and pierce each one with a skewer to let out the steam. Return to the oven for 5 minutes more (this dried the insides). Now transfer them to a wire rack to cool completely.

In the meantime, prepare the sauce: meting the butter and chocolate in a saucepan. Once molten stir-in the double cream and take off the heat then add the orange zest and the sugar. Beat together.

To fill the profiteroles, carefully slit the buns and spoon or pipe in the blend of ricotta cheese, orange zest and icing sugar. Arrange three profiteroles for each portion, spoon over the sauce and serve.

Note, do not fill the profiteroles more than 2 hours before you serve, or they will be soggy.

Thursday, 17 October 2013

Spaghetti with Meatballs Recipe

Here is a classic American recipe for an Italianate dish of spaghetti served with minced meat, onion and bread meatballs flavoured with Parmesan cheese in a tomato-based sauce.

This is one of the classic American dishes, and though many think it's traditionally Italian (and yes, it did originate with the Italian immigrant community in America) you will not see this dish (at least in this form) served anywhere in Italy.

Don't get me wrong, I love this dish and I prepare it often, though for my family, the addition of a couple of Scotch bonnets or Habanero chillies, finely chopped, to the meatball mixture is a must.

Here, though, I am giving the recipe in its basic, unadulterated, form... enjoy...


Spaghetti with Meatballs

Serves: 4
A bowl of spaghetti served topped with meatballs in a tomato sauce and garnished with fresh flat-leaf parsley

Ingredients:

400g (1 lb, scant) minced (ground) beef or pork
1 small onion, finely chopped
1 egg, beaten
5 garlic cloves, crushed
3 tbsp flat-leaf parsley, freshly chopped
3 tbsp finely-grated Parmesan cheese
1 tsp salt
1 tsp freshly-ground black pepper
2 slices white bread
3 tbsp milk
5 tbsp olive oil
3 x 400g (14 oz) tins plum tomatoes
1 tbsp unsalted butter
400g spaghetti

Method:

For the meatballs, combine the meat, onion, egg and most of the garlic, parsley, Parmesan cheese and the salt and black pepper in a bowl. Mix gently then set aside.

In the meantime, place the bread in a small bowl and pour over the milk. Allow to soak for 10 minutes then break the bread up into small pieces and add to the bowl with the meat.

Mix the ingredients with your hands then take pieces of the mixture and roll into 5cm balls. Place these on a baking tray lined with aluminium foil. Transfer to an oven pre-heated to 200ºC (400ºF, Gas Mark 6) and bake for about 15 minutes. Half way through give the meatballs a shake to prevent them from sticking.

Remove from the oven and set aside.

For the sauce, heat the olive oil in a saucepan. Add the remaining garlic and fry for about 1 minute or until just beginning to colour. Add the tomatoes and break them up with a spoon as they heat. Season to taste then bring to a simmer and cook for 5 minutes. Add the butter and the meatballs and bring back to a simmer. Allow the mixture to cook gently as you prepare the spaghetti.

Bring a pan of salted water to a boil, add the pasta and cook for about 8 minutes or until al dente (about 8 minutes). Drain and add to the pan with the sauce. Stir to combine and to coat the pasta in the sauce.

Serve spooned onto plates and sprinkled with Parmesan cheese.

For traditional Italian recipes, why not visit the Celtnet Italian recipes pages?

Pumpkin Oatmeal Biscuits (Cookies) Recipe

The time has passed so quickly that I had hardly noticed that it's less than a week to Halloween. I really have been tardy and hardly any Halloween recipes have been published on this blog to date. To rectify that here is an interesting new Halloween-based twist on the traditional Oat Biscuit (cookie).

This is a classic rustic biscuit made with mashed pumpkin and containing chocolate chips and dried cranberries that makes a different (and healthy) snack or treat for Halloween. Tough they are so tasty it's a shame to use them just for Halloween.

Of course, you do not just have to make these with pumpkin, I've made them just as well with boiled and mashed gem squash, but you could also use sweet potatoes, bananas or any starchy base that you can mash.

The basic spice blend here is what's known as 'allspice' in the UK and 'pumpkin pie spice' in the US.

You could buy canned pumpkin for this recipe, but it's so easy to make your own pumpkin purée that there's no need to bother. Just peel and de-seed pumpkin then steam until tender. Mash with a fork then press through a fine-meshed sieve with the back of a spoon to purée.

Pumpkin Oatmeal Biscuits (Cookies) Recipe

Makes:36
Classic Halloween biscuits (cookies) made from a pumpkin dough base with chocolate chips and dried cranberries

Ingredients:

250g (2 cups) plain flour
1 tsp baking soda
1 1/2 tsp ground cinnamon
1/4 tsp ground ginger
1/8 tsp freshly-grated nutmeg
1/8 tsp ground allspice
1/8 tsp ground cloves
1/4 tsp fine sea salt
200g (1 cup) unsalted butter, warmed to room temperature
200g (1 cup, packed) light brown sugar
200g (1 cup) granulated sugar
220g (1 cup) pumpkin purée
1 large egg
1 tsp vanilla extract
175g (1 1/2 cups) rolled oats
125g (1 cup) dark chocolate chips
100g (1 cup) dried cranberries

Method:

Mix together the flour, baking soda, cinnamon, ginger, nutmeg, allspice, cloves and salt in a bowl. Set aside.

Soften the butter in a separate bowl, add the sugars and cream with the butter until pale and fluffy. Add the eggs, one at a time, beating thoroughly to combine after each addition. Now add the pumpkin purée and the vanilla extract, beating well to combine. 

Gradually work in the flour mixture, mixing until the ingredients are thoroughly combined. Stir in the oats, chocolate chips and dried cranberries then drop the dough by the rounded tablespoon onto a baking tray lined with greaseproof (waxed) paper.

Transfer to an oven pre-heated to 170ºC (350ºF) and bake for about 12 minutes, or until the biscuits (cookies) are golden brown and cooked through. Allow to cool on the baking trays for 10 minutes then carefully transfer on a wire rack to cool completely.

To keep, store in an air-tight tin.

As a thank-you for reading this Halloween-themed recipe (and hopefully preparing it!), I have teamed with the Celtnet Recipes website to give anyone who wants it a completely free eBook of Halloween recipes. Simply go to the download your free Halloween recipes eBook and grab your copy today, absolutely no strings attached.


Tuesday, 15 October 2013

Deep Pear and Apple Pie

Most people associate deep apple pies with America. The truth is that they have been traditionally prepared in both Britain and Germany for centuries.

The use of pears seems to be a particularly British twist. It was common to use pears in pies during Tudor and Elizabethan times and raised pear pies were particularly enjoyed in London. It is very likely that Shakespeare would have partaken of these pies (for recipes, see this page of Tudor and Elizabethan recipes).

The recipe here is a modern version of these traditional pies that blends both pear and apple for the filling. The filling is purposely kept quite dry so that the pie can be sliced and lifted from its dish.

Deep Pear and Apple Pie

Serves: 8
Deep double crust pear and apple pie with a wedge taken out to show the filling

Ingredients:

For the Pastry:

350g (3/4 lb) fine plain flour
pinch of salt
175g (7 oz) unsalted butter, finely diced
cold water, to mix

For the Filling:

500g (1 lb) Bramley apples, peeled, cored and sliced thickly
500g (1 lb) dessert pears, peeled, cored and sliced thickly
50g (2 oz) sugar (or to taste)

For the Glaze:

1 tbsp milk
1 tbsp caster sugar

Method:

Begin with the pastry. Sift together the flour and salt into a bowl. Add the butter and rub into the flour with your fingertips until the mixture resembles fine crumbs. Using a knife, mix in just enough ice cold water to bring the ingredients together as a stiff dough. Bring the pastry together as a ball, wrap in clingfilm (plastic wrap) and set aside in the refrigerator to rest as you prepare the filling.

Combine the apples and pears in a pan with 1 tbsp water and sugar, to taste. Bring to a simmer, cover and cook gently for about 5 minutes, or until the fruit just begins to soften. Take off the heat and set aside to cool.

Take 2/3 of the pastry and roll out until large enough to cover the base and sides of a deep pie dish. Use the cooled apple and pear mix to fill the pastry then roll out the remaining pastry and form into a lid. Use this to cover the pie. Flute the edges to crimp then trim off any excess.

Form steam holes in the centre, then brush the top with milk before sprinkling over the caster sugar.

Transfer to an oven pre-heated to 170ºC (350ºF, Gas Mark 5) and bake for about 35 minutes, or until the pastry is golden brown.

This can be served hot or cold and makes an excellent dessert, served with custard, ice cream or cream.

For more information on historic apple and pear varieties and the types that would have been used from the Medieval period, through Shakespeare's time to Victorian times, see this page on historic foods and varieties.

Vegetable Pasta Nests Recipes

Here is another classic vegetarian recipe that works well either as a starter or as a main course.

Here we have nests made from baked spaghetti served topped with a mixture of grilled vegetables.

These pasta nests are very versatile and can be made from Italian pasta or from oriental-style noodles and can be topped with everything. I have even made dessert versions topped with mixed fruit and chocolate sauce.

As you can see this is a versatile and adaptable recipe!

Vegetable Pasta Nests Recipe

Serves: 4
Nests made from baked spaghetti topped with mixed grilled vegetables.

Ingredients:

175g (6 oz) spaghetti
1 aubergine (eggplant), halved lengthways and sliced
1 courgette (zucchini), diced
1 red bell pepper, de-seeded and chopped at a bias (diagonally)
6 tbsp olive oil
2 garlic cloves, crushed
50g (1 3/4 oz) butter, melted
2 tbsp dry white breadcrumbs
salt and freshly-ground black pepper, to taste
fresh parsley sprigs, to garnish

Method:

Bring a large pan of water to a boil. Add the spaghetti and cook for about 8 minutes, or until al dente. Drain thoroughly and set aside until needed.

Arrange the aubergine, courgette and bell pepper slices on a baking tray. In a small bowl, mix together the garlic and the olive oil then pour over the vegetables, tossing them to coat.

Place under a pre-heated grill (broiler) for about 10 minutes, turning occasionally and cooking until tender and lightly charred. Set aside to keep warm.

Divide the spaghetti between 4 lightly-greased Yorkshire pudding tins then, using a fork, curl the spaghetti to form nests.

Brush the pasta nests with melted butter and sprinkle over the breadcrumbs. Transfer to an oven pre-heated to 200ºC and bake for about 15 minutes, or until lightly golden. Remove the pasta nests from the tins and transfer to serving plates. Divide the grilled vegetables between the pasta nests. Season to taste, and serve.

Potato and Spice Scones Recipe

Potato-based scones are made in both Scotland and Ireland. This version is based on a classic Irish recipe. Indeed, potatoes are used for all kinds of baking... from pastries through breads to cakes in Ireland.

Potatoes in baking do not make the foods they are cooked with heavy, as some people think. In fact they help keep baked goods moist and improve their lightness.

As well as potatoes, you could substitute bananas, sweet potatoes, yams or even beetroot in this recipe.

The scones are flavoured with the classic spice combination of nutmeg, cloves, cinnamon and allspice, a traditional Victorian blend from the British Isles.

Potato and Spice Scones

Serves: 8
Potato-based scones containing sultanas and flavoured with cloves, cinnamon, allspice and nutmeg

Ingredients

225g (8 oz) floury potatoes, diced
125g (4 1/2 oz) plain flour
1 1/2 tsp baking powder
1/2 tsp freshly-grated nutmeg
1/4 tsp ground cloves
1/2 tsp ground cinnamon
1/4 tsp ground allspice
50g (2 oz) sultanas (golden raisins)
1 egg, beaten
50ml (3 tbsp) double cream
2 tsp soft light brown sugar

Method:

Bring a pan of water to a boil, add the diced potatoes and cook for about 10 minutes, or until tender. Drain thoroughly, then mash the potatoes.

Turn the mashed potatoes into a large bowl and stir in the flour, baking powder, nutmeg, cloves, cinnamon and allspice. Add the sultanas, egg and cream then beat the ingredient with a spoon until smooth and thoroughly combined.

Divide the dough into 8 equal portions and shape into rounds about 2cm thick. Sit these on a baking tray (cookie sheet).

Transfer to an oven pre-heated to 200°C (400ºF, Gas Mark 6) and bake for about 15 minutes, or until the scones are well risen and golden brown on top.

Remove from the oven, sprinkle with brown sugar and serve warm, spread with butter.

Sunday, 13 October 2013

Iced Summer Berries with Hot White Chocolate Sauce Recipe

Here is an elegant dessert that would grace the table at any dinner party. But the secret is that it's ridiculously easy to make.

This is a store-cupboard classic that gives you an elegant, delicious but very simple to make dessert. The secret is to ensure that the berries are just frozen before you pour over the hot white chocolate sauce.

Despite looking and tasting a million dollars this dessert is truly simple and quick to preserve. It's one of those standby desserts that every cook should know about. You really do want a copy of this in your cookbook.

Don't believe me? Just take a look at how simple the recipe is, yet how good the dessert looks.

If you're careful, you can even cook this outside on the barbecue for summer.

Iced Summer Berries with Hot White Chocolate Sauce Recipe

Serves: 4
Chilled summer berries served on a dessert place and drizzled with a white chocolate sauce

Ingredients:

175g white chocolate, chopped
150ml single cream
1 tsp lavender honey
450g frozen mixed summer berries

Method:

You will need to take the frozen summer berries out of the freezer about 10 minutes before you are due to serve them.

Combine the white chocolate, cream and honey in a heat-proof bowl. Set this over a pan of just-simmering water (ensure that the base of the bowl does not touch the water). Cook, stirring continuously with a rubber spatula until all the chocolate has melted and blended with the cream and honey.

Arrange the part-thawed berries on individual serving plates then pour over the white chocolate sauce. Serve immediately.

Buttery Jam Tarts Recipe

This recipe is a real blast from the past for me, made exactly as my grandmother used to prepare them. These are designed to appeal to kids and they really should look a little rustic. It's even better if you can get your kids to help shape them before filling with jam and popping in the oven.

I remember these fondly at various tea parties and family gatherings and they are something I want my own kids to delight in and enjoy.

Of course, you don't just have to use jam... mincemeat and savoury chutneys also work and these variants make great appetisers for the grown ups to be served with a glass of wine.

However, it's the children's version with their jam or curd fillings that will always bring back fondest memories for me.

Buttery Jam Tarts

Makes: 18
Little tartlets of jam (jelly) in a buttery pastry crust oven baked until golden. Ideal for kids and kids' parties

Ingredients:

200g (7 oz) plain flour
50g (2 oz) cornflour (cornstarch)
100g (4 oz) unsalted butter, chilled and diced
120g (5 oz) icing sugar
2 egg yolks
5 tbsp apricot, blackcurrant and/or strawberry jam (or use lemon or orange curd)

Method:

Sift together the flour and cornflour into a bowl. Add the butter and rub in with your fingertips until the mixture resembles fine crumbs.

Stir in the icing sugar until thoroughly mixed then add the egg yolk and bring the mixture together to form a smooth dough (if it's a little sticky at this point, dust with a little flour).

Break off walnut-sized pieces of the dough and use them to line the wells of a 12-hole petit four tart tin. Use your fingers (or a tart tamper) to mould the pastry to the wells of the tin.

Line 18 wells with the dough. Fill each well with 1 tsp jam. Set the tart tins in the refrigerator to chill for 30 minutes then transfer to an oven pre-heated to 180°C and bake for about 10 minutes, or until the pastry is pale golden brown.

Remove from the oven and allow to cool completely in the tins before turning out.

Serve cold.

Saturday, 12 October 2013

Salmon Steaks with Herb Sauce Recipe

Today is a slightly more 'restuaranty' and less homely recipe... but it's still quick and easy to make. Great for that Saturday night in meal with a glass of wine.

Salmon is always an excellent fish to cook at any time, but the pairing with cheese and herbs offered here makes the dish a little more interesting. Or at the very least, puts it a little out of the ordinary. Especially as the dish uses fresh chervil as one of it's main herb flavourings. Chervil is an herb used frequently in France, but which is seldom seen elsewhere but which really deserves wider recognition and use as a culinary herb.

So here is my tribute to salmon, the king of fish and chervil, a culinary herb that deserves to be much more widely known.

Salmon Steaks with Herb Sauce Recipe

Serves: 4
Salmon steaks served on a bed of lettuce and drizzled with a cheesy herb sauce

Ingredients:

4 salmon steaks (each about 175g [7 oz])
2 tbsp butter
2 tbsp plain flour
120g (7 oz) Wensleydale cheese, grated
1 tbsp fresh chervil, finely chopped
8 blades of chives, finely chopped
finely-grated zest of 1 lemon
1 tbsp fresh lemon juice
rocket (arugula) leaves, to accompany
torn chervil leaves, to garnish

Method:

Line a grill pan with kitchen foil and rub with butter. Sit the salmon steaks on the grill pan, place under a medium grill (broiler) and cook for about 4 minutes per side. At this point turn the heat off, but leave the salmon under the grill to keep them warm as you prepare the sauce.

Melt the butter in a saucepan, scatter over the flour and stir to form a smooth paste. Work in 6 tbsp of the milk until smooth then whisk in the remaining milk. Slowly bring the mixture to a boil, whisking constantly as the sauce thickens to ensure that there are no lumps.

Add the cheese and stir until melted then fold in the herbs. Take the sauce off the heat and add the lemon juice and zest. Stir until well combined.

Arrange each salmon steak on a bed of six rocket leaves. Drizzle over the sauce, decorate with the chervil sprigs and serve immediately.

Thursday, 10 October 2013

Gem Squash with Bolognese Sauce Recipe

I have a glut of gem squashes in the garden at the moment, and as I've never really used them much up to now, I've been experimenting with recipes for how to prepare  them (I even have a South African recipe to turn them into a starter or a dessert).

This recipe is based on another South African original that I've Europeanized by substituting a bolognese sauce for the original chakalaka. Of course, as a result, as well as a novel way of using gem squashes, this recipe also gives you a traditional recipe for bolognese ragù (bolognese sauce) that you can serve with your own pasta dishes, or use as the meat base for a lasagne.

Want something different to the usual spaghetti topped with bolognese sauce? Well, why not try this delicious gem squash recipe instead. Simple to make... it works well with bought sauce, but is much better with home-made. Topped with cheese this makes a substantial starter, or served with salad it gives you a whole meal. Though the recipe given below uses beef mince, you could substitute finely chopped pepperoni or, for a vegetarian version substitute finely-diced mushrooms. So here is a classic Italian recipe, with a bit of a twist.

Gem Squash with Bolognese Sauce Recipe

Serves: 4
Boiled gem squash half, served topped with bolognese sauce and grated cheese

Ingredients:

2 gem squashes, halved and with the seeds scooped out

For the Bolognese Sauce:

400g (1 lb, scant) lean minced beef
2 small onions, finely chopped
2 celery sticks, finely chopped
1 medium carrot, finely chopped
3 tbsp olive oil
45g (1 1/2 oz) butter
8 tbsp milk
250ml (1 cup) dry white wine
1/8 tsp freshly-grated nutmeg
400g (15 oz) tinned Italian tomatoes, with the juice

4 tbsp cheese, grated
freshly-ground black pepper, to taste

Method:

Begin with the Bolognese ragù: Add the olive oil and butter to the base of a large, heavy-based cooking pot. Set over medium heat and when foaming add the onion and fry until softened (about 6 minutes). Now add the carrot and celery and cook for about 2 more minutes, stirring frequently.

Crumble the beef into the pot and cook, briefly, stirring constantly, until the meat is just coloured on the outside. Season to taste with salt and freshly-ground black pepper, then pour the wine into the pot. Bring to a simmer and continue cooking until almost all the wine has evaporated, stirring frequently. Chop the tomatoes and add to the pot along with their juice. Bring to a slow simmer then reduce the heat to the merest murmur. Secure the lid and continue cooking for 4 hours. After this process the ragù will keep for at least four days in the refrigerator.

When ready to serve re-heat the ragù then bring a large pan of lightly-salted water to a boil. Halve the gem squashes and scoop out the seeds from the centre. Add to the pan of boiling water and cook for about 25 minutes, or until cooked tender.

To serve, set the gem squashes on warmed plates and spoon the bolognese sauce into them. Sprinkle over the grated cheese and serve immediately.

If you like your cheese melted, then just pop this under a grill (broiler) for a few minutes until the cheese has melted.